I am assuming you have used the online graphical portal a bit and now you want to be more productive and start some rudimentary automation. We don’t expect you do use the portal for everything. For an IT Pro – the logical choice is to use PowerShell and work like an admin from your workstation. Before I go into more depth on all sorts of components and features/capabilities of Windows Azure, let’s prep your workstation for some automation.
Step 1: Download the files.
Head on over to the download page from the Windows Azure site. http://www.windowsazure.com/en-us/downloads/

This will kick off the download of the Web Platform Installer. This tool will be available on your system to download the current version as well as all the updates we periodically make to the cmdlets.
Step 2: Use the Web Platform Installer to install cmdlets and dependencies.
It’s not just the cmdlets that will download – it’s also all the dependencies that come down and get updated as well. don’t worry – the Web Platform Installer (WebPI) has you covered for ensuring everything is up to date.

Step3: Put the install location into your path
This is optional, but helpful if you will be using the cmdlets a lot. There a a number of ways to do this, but in my opinion, the least invasive way is to update your PATH environment variable with the Azure cmdlets install path.
The cmdlets are installed (by default) in C:Program Files (x86)Microsoft SDKsWindows AzurePowerShellAzure
Pull up your system properties. (I right click on “This PC” or My Computer and choose properties). Click on Advanced System Settings.

Click on Environment Variables

Update the path statement to include C:Program Files (x86)Microsoft SDKsWindows AzurePowerShellAzure. Don’t forget to go to the end of the line and add a ; before overwriting your path!

Close off all your windows with the OK buttons and you are good to go.
Step 4: try it out in PowerShell and PowerShell ISE
Just to make sure – check it out in your PowerShell window and tool of your choice.


Fairly simple and straight forward – but surprisingly hard to find out how to set it up in the easiest way possible. From now on – this system is ready to go with the Azure PowerShell cmdlets.
Step 5: Simplify Your Settings
When you need to run a command against your Windows Azure subscription, the session will need some settings to be referenced a lot. This means you will get a window pop-up to login to your Microsoft Account or account you are using to manage and interact with your subscription via the portal. To make your life WAY easier – if this is your “management workstation” that you maintain and secure, you can download your Azure Publish Settings file including your management certificate. Trust me – it will make your life easier if you do this. It’s so simple.
From a PowerShell prompt, type in:
PS C:> Get-AzurePublishSettingsFile
That will require authentication to the Azure Portal in order to create your Settings File.

It will prompt you to download and save it to a secure location. Change to that location in your PowerShell window and then type in:
PS C:> Import-AzurePublishSettingsFile
If you were not in the proper directory where the file resides, you will need to include the full path and name of the file.
To check if the settings file worked correctly – check what subscription is active in the PowerShell console session by typing in:
PS C:> Get-AzureSubscription
This should respond with details of your subscription, including details on the management certificate which will be valid for one year.
That’s It – You Are DONE!
Step 6: What about Updates?
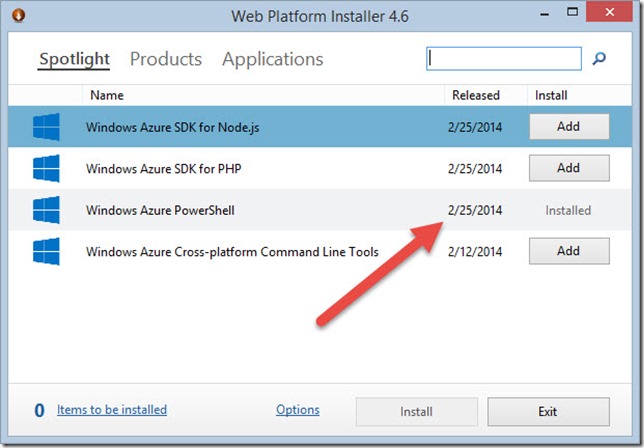
That’s simple! Periodically run the WebPI utility to ensure there are no updates.

Notice the date for Windows Azure PowerShell AND that there is no option to “add” it anymore as it has already been installed. If updates are available that button will become active once again.
That’s about it – if there was an update, it would come down to the appropriate path that has already been added to the system path and therefore all new PowerShell windows and ISE sessions would automatically be updated with new functionality.
My favourite way to do step 2 is to do it silently:
webpicmd.exe /install /products:WindowsAzurePowershell
In fact, I like doing step 1 silently as well:
new-item -path C:source -itemtype Directory
$storageDir = “C:source”
$webclient = New-Object System.Net.WebClient
$url = “http://go.microsoft.com/fwlink/?LinkId=255386”
$file = “$storageDirWebPiInstaller.exe”
$webclient.DownloadFile($url,$file)
Start-process -filepath C:sourceWebPiInstaller.exe -argumentlist quiet -wait