(NOTE 3/11/14: clarification on billing with “spending limits feature” has been added. See italicized text in bullet points for additions)
No seriously – where do I get it?
Do I have to get some sales guy to come and sell it to me? Do I contact a software reseller to sell me a copy? Do I need gobs of cash to be able to try this out?
In short – the answer is NO.
The fastest and simplest way to get started is to get your own free trial.
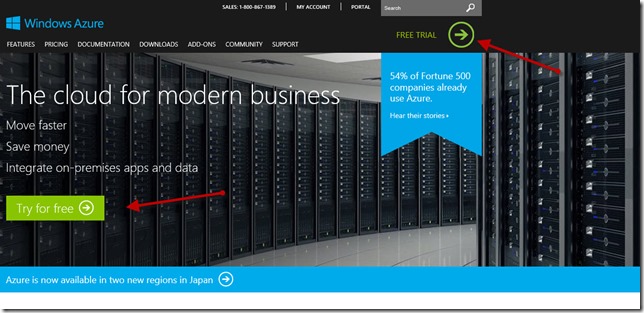
go to www.windowsazure.com
I think it is relatively apparent where you go for the Free Trial – but I thought I’d highlight the arrows with more arrows in red.
You’ve got links to a FAQ, a phone number you can call to answer questions and $200 in credit to spend on your trial. I suggest you take a moment to read the FAQ. There are a lot of preconceived notions that are either false or greatly out of date with regards to signing up for a free trial. I’ll highlight a couple below:
- You can use the $200 to try out any number of services without restriction (except the $200 credit limit or 30 days – whichever comes first).
- The trial is absolutely FREE – you will not be charged for anything above and beyond the $200 credit.
- MYTHBUSTER: we do not charge you for overages or “mistakes” you make during this trial because you are unfamiliar with how billing works and you are in a “learning phase”. In the past we did not have a “cap” that could be added to protect early adopters from getting bills they didn’t expect.
- CreditCard and Microsoft Account are required.
- MYTHBUSTER: as mentioned above – we do not charge your card for this free trial. You are welcome to use your business or personal card – they are used for identification purposes only. I mean – come on- we don’t want people spinning up services and VMs to do BitcoinMining things without knowing who they are.
- If you exceed the $200 credit limit on this trial or hit 30 days, the services and account will be automatically suspended. You are welcome to convert the trial into a simple “Pay-As-You-go” option to maintain your services and will be billed accordingly for services use.
- The Spending Limit feature is targeted to the MSDN and Partner Cloud network members. It is not available on the Pay-As-You-Go or consumption plans. It was designed to ensure these members won’t get billed while they are developing solutions on the Azure Platform.
- You are able to sign up for Billing Alerts to warn you when you are approaching thresholds and want to proactively scale back before incurring charges. See this article for more details.
- Azure Free Trials are available in all countries/regions where Azure is commercially available. Windows Azure is currently (as of March 1st, 2014) available in the following 84 countries/regions: Algeria, Argentina, Australia, Austria, Azerbaijan, Bahrain, Belgium, Brazil, Bulgaria, Canada, Chile, Colombia, Costa Rica, Croatia, Cyprus, Czech Republic, Denmark, Dominican Republic, Ecuador, Egypt, El Salvador, Estonia, Finland, France, Germany, Greece, Guatemala, Hong Kong, Hungary, Iceland, India, Indonesia, Ireland, Israel, Italy, Japan, Jordan, Kenya, Korea, Kuwait, Latvia, Liechtenstein, Lithuania, Luxembourg, Macedonia (FYRO), Malaysia, Malta, Mexico, Montenegro, Morocco, Netherlands, New Zealand, Nigeria, Norway, Oman, Pakistan, Panama, Paraguay, Peru, Philippines, Poland, Portugal, Puerto Rico, Qatar, Romania, Saudi Arabia, Serbia, Singapore, Slovakia, Slovenia, South Africa, Spain, Sri Lanka, Sweden, Switzerland, Taiwan, Thailand, Trinidad and Tobago, Tunisia, UAE, UK, United States, Uruguay, Venezuela, Belarus, Kazakhstan, Turkey, Ukraine, and Russia.
Note regarding the Credit Card requirements: All online “cloud” services space require a credit card for identity verification and trials these days. It’s the minimum bar for entry to ensure some level of validation / accountability. If you don’t have one, you might be able to register one of those “pre-paid charge cards” from a store, provided you registered your information for online purchases – but I’ve never tried it myself.
If you want more details on the plans and how the Spending Limit works – check out this article. If you want to know how to setup Billing Alerts, check out this article.
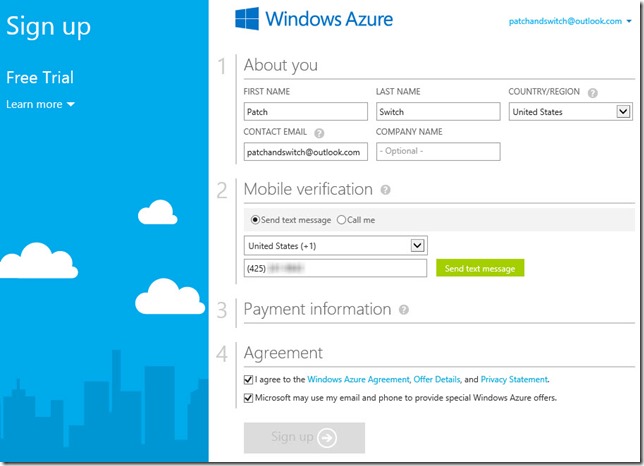
Fill out the registration details with validation text message or automated voice call.
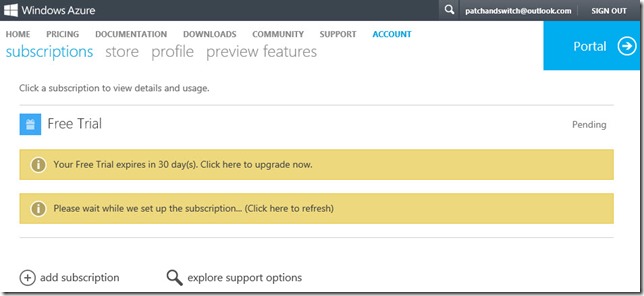
Once the code gets validated, the payment information becomes available. Once confirmed, you should end up at the Subscriptions page with a “pending status” as we get things setup for you.
This can take some time – click on the (Click here to refresh) option to check on it’s status. When I wrote this blog post it took all of a minute to be ready. Once you are listed as “Active” (my screenshot shows “Pending”) you can click on the blue Portal area up in the right corner.
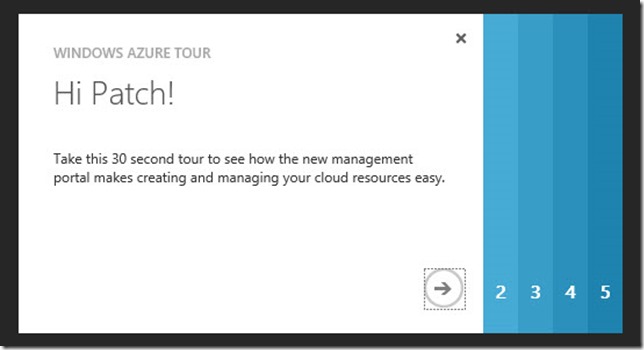
Once you progress to the portal – a quick tour option is available to walk you through the very basic functionality of what the Management portal can do and it’s various notification areas that are context sensitive.
Once you have gone through the quick 5 slices of info – you are dropped into the Management Portal for your Windows Azure account. You’ll be spending some time in here working with the services and setting things up. I’ll be going over a bunch of things I’ve done in here as part of this ongoing series. Take some time, explore a bit and check out the Help in the bottom right corner of the management portal.
Lets have some quick fun – something all of us ServerHuggers can embrace and understand – Lets make a Windows Server 2012 R2 Virtual Machine and RDP into it!. To keep things REAL simple – I suggest you try out the Quick Create of a VirtualMachine from the big NEW button at the bottom left of your portal.
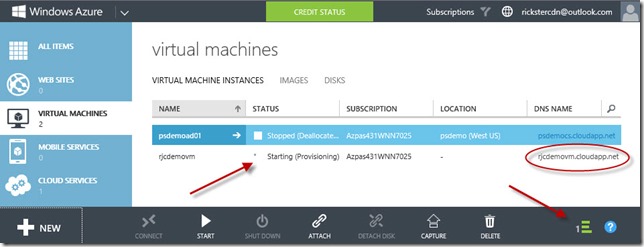
Fill in a unique DNS name (I use my initials RJC with demoVM to make RJCDemovm), create a local admin user name and confirm a admin password. Finally, choose a region/affinity group (where will it be hosted) and click on “Create Virtual Machine”. Once the info has been submitted – Azure will start the provisioning process and give you a status update in the portal. You can see from the shot below – mine is provisioning, it has a name of rjcdemo.cloudapp.net and you can see a job to finish it’s provisioning is running by the animated green bars in the bottom right corner of the portal.
Notice it takes some time to spin up – think of a VHD being copied out of a VM Library and then being assigned into your storage and finally being started for the first time. It has to go through the initial Sysprep like first boot activities and have configuration settings passed through to it via a custom made unattend.xml file (where do you think it got the username and password to create from?). Eventually it will come up to a Running state.
Once it hits that Running State – you have the billing meter running (against your $200 free credit) to the tune of about $0.10 / hr for a small instance. It’s billed by the minute and you are NOT charged when it is Shut Down – so don’t forget to shut it down when you are done playing with it.
You’ll notice at the bottom, when the machine is selected you can Connect, Restart, Shut Down, Attach / detach disk, capture and Delete. Click on the CONNECT button.
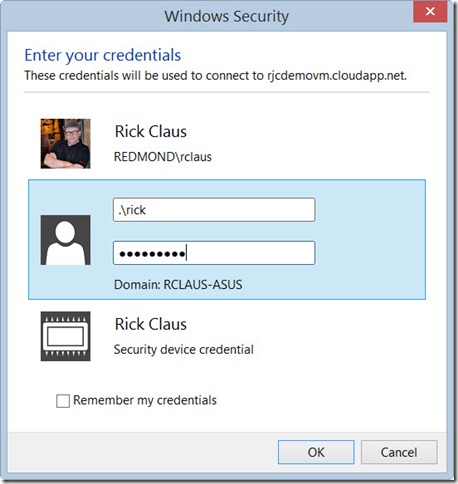
A familiar open/save dialogue opens up – save the file someplace – it’s just a RDP file that has the Fully Qualified Domain Name to your VM and the special non-standard listening port for the RDP connection (in my case it’s rjcdemovm.cloudapp.net:52778). This gets re-mapped to the proper 3389 port by Azure (more on this later). Launch this connection and sign in with the Admin ID and password you filled out in the Quick Connect form and Voila!
NOTE: In case you didn’t know, if you sign in with a .{username} it signifies that you are logging in to the LOCAL account database of the system (since it’s not domain joined AND since I am running this demo from my corporate machine – you can see me authenticate correctly in the middle with local creds).
Accept the certificate warning and the RDP session opens to your new desktop of a server running in the cloud on an ISOLATED network that has been NAT’ed behind the Azure firewall. Feels like home, eh? Go ahead – poke around, check out and explore all the sort of stuff you would do when you rack a server or spin up a VM for the first time. Kick the tires and play around – all seems very familiar, eh?
ok – that’s enough for this post. Once you are done playing around, log off the Virtual Machine and return to the Azure Management Portal. From there, select the machine and choose SHUTDOWN from the bottom bar. This will gracefully shutdown the VM and stop the charges for the machine in order to preserve your credit. If you forget – it’s going to cost you $1.20 to run this overnight for 12 hrs or so – not exactly going to break the bank.
Congrats on taking the first step towards this Cloud thing as a ServerHugger.
it wasn’t so bad now, was it?
P.S. One last thing:
If you are from the developer side of the house in IT – you might already have an MSDN subscription that includes reoccurring monthly credits and benefits that can be activated. If you’re an IT guy who sits on the Infrastructure side of the house – you might want to check to see if your developer brethren have already started using this benefit and see if you can get in to the action. You see – you can have multiple admins and access to subscriptions for access to these benefits. But really – you probably want your own space to play in and learn.




Keep them coming I am learning Azure from your blog so everything you learn I learn as a Server Hugger this is much appreciated